Showing posts with label flowers. Show all posts

Thursday, January 20, 2011

Double Flower Headband Pattern

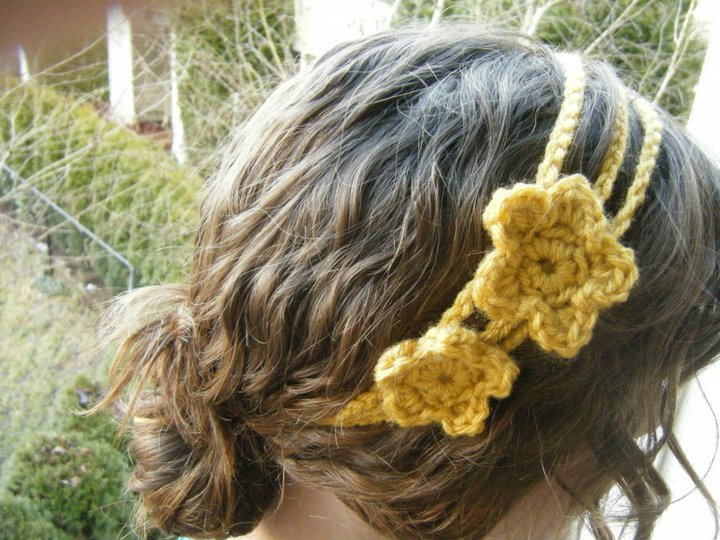
I have been waiting ALL WEEK to show you this...


Isn't it Beautiful!?
I am so proud of this little headband that I could just do a flip...well, probably not a flip. I never was any good at gymnastics.

The flower and bands are my own patterns
and since I LOVE all of you so much
I'm going to share it with all of you
(Sharing is caring, right?)

The "Lucy" Headband Pattern


Difficulty: Easy - Medium
Time: 30 minutes
Fun-ness: How could it not be?
Materials:
Yarn (any kind)
Crochet Hook - Size H
Yarn Needle
Ribbon
Scissors
Glue Gun

**The following instructions are based on the assumption that you already know the basics of crocheting. If you are trying it for the first time, here is a good video to help you with the basics as you follow the tutorial. 

ch: Chain
sk st: Skip Stitch
sl st: Slip Stitch
sc: Single Crochet
hdc: Half Double Crochet
dc: Double Crochet


Headband: Check out my TUTORIAL from November. It takes you step by step on how to create your headband :)


Big Flower: 
Round 1: ch 4 and sl st to join and form a small circle
Round 2: ch 2 and sc 9 times into center of circle.
Round 3: ch 2, skip the first sc, and sl st into 2nd worked sc. ch 2, sk st and sl st into next. Continue until you have 5 ch spaces (sl st to join)
Round 4: Into 1st worked ch space, sl st, sc, hdc, dc, hdc, s, sl st. Complete this round of stitches into each of the remaining ch spaces. Tie off to finish.


Small Flower:

Round 1: ch 4 and sl st to join and form a small circle
Round 2: ch 2 and sc 9 times into center of circle.
Round 3: ch 2, skip the first sc, and sl st into 2nd worked sc. ch 2, sk st and sl st into next. Continue until you have 5 ch spaces (sl st to join)
Round 4: Into 1st worked ch space, sl st, hdc, dc, hdc, sl st. Complete this round of stitches into each of the remaining ch spaces. Tie off to finish.

Putting it all Together
Using hot glue, attach the flowers where you like them on the headband. 
Done and Done!

Alright, so you want the headband, but you don't have time to make one yourself
That's okay, because I actually have a few that I am 
This is my FIRST experience selling anything on Etsy, so I am 
excited and nervous and hopeful. 
My husband told me that if I can sell 10 headbands, I can get a Blog Makeover (which would be amazing!)
So help a girl out! 

Go HERE for my Shop

Tuesday, January 4, 2011

Rose Magnet Tutorial

My good husband knows me well
For Christmas he mainly stuck to the crafting aisles

smart boy 

For a stocking stuffer, he picked up some Bake Shop Clay 
Which resulted in this:

Rose Magnet Tutorial


Difficulty: Easy-Peezy Pumpkin Squeezy
Time:  30 minutes
Cost: $1-2, depending on where you shop
Fun-ness: Would I lead you astray?


Materials Needed
Oven Bake Clay
Paint
Strong Magnet
Paint Brush
Glue Gun
Scissors
Oven

Step 1: Rolling the Center
Roll a ball about the size of a small marble. Press into a flat oval. Using your index finger and thumb, roll the clay into a spiral. The bottom should be closed, while the top open like a flower bud.


Step 2: Adding your Petals
Start by make a ball the size of a large pea. Flatten into an oval shape, and wrap loosely around the center. Create a second ball, flatten, and wrap around the center, overlapping the first petal. Continue this process until you have reached the size you want (or you just run out of clay)

Step 3: Creating your Base
You want a flat bottom to give the magnet plenty of surface to cling to. Easiest way is to use scissors, and carefully cut the bottom off. If you push down too hard, you will crush your petals...Like I did on my first attempt...

Step 4: Baking
Preheat the oven to 275 degrees Fahrenheit (or whatever the package directs), and place on a cooking sheet. Bake for 15 minutes. Take out and allow to cool....Maybe take an ice cream break...


Step 5: Painting
Grab out your favorite paint color and go to town!


Step 6: Gluing the Magnet
Once you've painted your entire flower, hot glue the magnet onto the back. Honestly, I am a cheap-o, and busted a magnet off of a magnet clip from my fridge. It took a hammer, a screwdriver, and a husband. I'm sure that saved me all of 10 cents. 

And that's it!!


Cute, easy, and inexpensive. Could it get any better?

Sunday, December 26, 2010

Hair Rosette Tutorial

Have you ever wondered how to make these fabulously cute 
Hair Rosettes that everyone is wearing?
ME TOO!

Of course when I saw someone wearing one at church last week, 
I bombarded them with questions
How did you make it!? How much material?! How does it stay put?

I got straight to work last week, and am IN LOVE with these flowers!!
 And now I get to pass on my new found knowledge onto you...

HAIR ROSETTE TUTORIAL

Difficulty: Easy
Time: 20 minutes
Cost: Maybe 50 cents? Seriously CHEAP
Fun-ness: You're going to have a cow!


Materials Needed
1/8 yard of fabric
Felt (any color)
Alligator Clip (found at Sally's Beauty Supply - 100 clips for 5 bucks)
Scissors
Glue Gun
Iron

Step 1: Cut Fabric
Cut the fabric into a 4 x 36 inch strip (or whatever the width of the fabric happens to be!)


Step 2: Iron
Take the fabric, fold it in half (length wise), and iron the fold. This will make it easier to create the flower


Step 3: Twist up that Flower!
When you start off, you need to make a flower "center" you can do this by folding a small triangle (bud) like me, or I've even seen people make a small knot. It's up to you! Once you have your center, start folding the fabric around the center, and and slowly turn the flower, and create another fold. Continue this process - Fold, turn, fold, turn, fold, turn. There is no right or wrong way to do this! No two flowers should look the same :)


Step 4: Hot Glue like there's no tomorrow!
Hot glue between each layer. Be careful not to take your flower apart too much! I generally start by gluing the end in place, and then go back to the middle, and work my way out. You only need to use dots of glue in each spot. To check if you have glued it enough, tough at the middle, and see if it holds up. If not, keep on gluing!


Step 5: Finishing it up
To finish, cut a 2 inch circle and hot glue to the back of the flower. This will keep the back all together and give it a finished look. If you plan on using it for a hair clip, hot glue an alligator clip into place


And that's it! You're done! See, that wasn't so hard!