First of all, let me just say that I can't take credit for this craft
An amazing woman at my church came up with it, and worked out ALL of the logistics.
And it's a pretty logistical craft.
But it's just SO cool that I couldn't NOT share.
Because I've NEVER seen a tree like this!
* 18 pieces of scrapbook paper (You may have some left over, but you should be safe with 18)
6 - Bright Gold
6 - Beige Marble
6 - Cream
(You can also choose to do it in 3 shades of Green or 3 shades of Silver
- Pictured in chart)
* Tracing Templates (Printed from this post)
* Scissors
* Mini Stapler (You could also use double sided tape or hot glue)
* Wooden block for the base
* Wooden dowel - 12 inches
* Wooden star
* Craft Paint for the base/dowel/star
Step 1: Base
Get a small square piece of wood, dowel and wooden star from any crafting store. Drill a small hole right in the middle of the wood, large enough for the dowel. Glue the dowel into the hole. Using that same drill bit, drill about 1/2 an inch into the side of the star. This will allow it to sit on top of the dowel. DO NOT GLUE the star!! Paint all your pieces your desired color (I chose Gold)
Step 2: Tracing/ Cutting
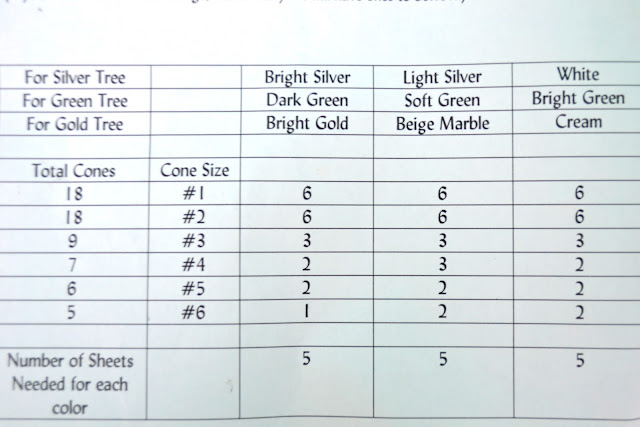
This part is a little tricky, so just stay with me. First print out the templates (shown below) onto a heavy duty card stock. Make sure you punch holes in the templates where I've traced. Using the chart below along with the templates, you are going to trace and cut out your different pieces. You can ignore the first two rows (That say "For Silver Tree" and "For Green Tree") and move right down to the third row that says "For Gold Tree".
For cone size #1, you are going to trace 6 Bright Gold, 6 Beige Marble, and 6 Cream (18 total for size #1). Label ALL of those sheets on the back #1.
For cone size #2, you are going to trace 6 Bright Gold, 6 Beige Marge and 6 Cream (18 total for size #2). Make sure you label them all #2.
Continue tracing and labeling for size 3, 4, 5 and 6 (Use the chart to figure out the numbers). Don't forget to trace where the hole punch goes. After you've traced, cut out all of your shapes
Step 3: Stapling and Hole Punching
At this point, you should have cut out a total of 63 pieces of varying shades and sizes. Take the bottom corners and pull them together so they barely overlap and staple (or hot glue or glue dot...). Do this to every single piece. After you've finished that, hole punch the top of each piece. Then create 3 stacks (one of each shade) stacking in number order.
Step 4: Stacking
When stacking, the key is to alternate the colors, starting with your "size #1" shapes. Continue to work around your tree, making sure your colors are evenly distributed.
Once you get to the top, place your star to hold your work. Don't glue your star, because it'll make after Christmas storage much easier if you can take the paper off the base.


6 comments:
i LOVE this!!! I think I'm going to have to recreate it! So, cute! Thanks for sharing!
http://sunshinelifelove.blogspot.com/
This is amazing! I'd love for you to link up and share if you have a moment: http://tutusandteaparties.blogspot.com/2011/12/pinteresting-party-with-features-week.html
I've seen these made using Christmas cards that you received, instead of throwing them out after the holiday
beautiful!! thank you : )
Your writing style has been amazed me.
Thank you, very great article.
Post a Comment